Here are the directions I take to get to Blue Coat. If you follow an online map program, sometimes they take you a "quicker" route, but the safety of their directions can be a little suspect.
From LG:
17N
85N
exit El Camino Real
L on S. Mary
Blue Coat will be at 420 N. Mary shortly after you pass the train tracks.
The parking garage is around towards the rear of the complex...if you get this far you can't miss it.
Friday, May 21, 2010


Tuesday, May 18, 2010
Extra Credit/Blue Coat Showcase Info.
This year's Blue Coat Systems Inc. Community Art Showcase is this Friday, May 21st from 4-7 pm.
As usual, for those in attendance I will give extra credit if you see me while there.
Unfortunately this year is will not be able to stay for the entire duration of the showcase, and will have to leave around 5-5:15.
I hope you can make it there to see the work from your peers and the other schools that will be showing. Blue Coat Systems does a great job with the event, so I hope you can make it.
More information can be found on the Blue Coat Systems page here.
The address is 420 N. Mary Ave., Sunnyvale, CA
As usual, for those in attendance I will give extra credit if you see me while there.
Unfortunately this year is will not be able to stay for the entire duration of the showcase, and will have to leave around 5-5:15.
I hope you can make it there to see the work from your peers and the other schools that will be showing. Blue Coat Systems does a great job with the event, so I hope you can make it.
More information can be found on the Blue Coat Systems page here.
The address is 420 N. Mary Ave., Sunnyvale, CA
Wednesday, May 5, 2010
Ernie's Message for Adv. Art Students
O.K., not really from Ernie...but it makes me laugh...
Mark your calendars...the giving out of our annual art awards (Excellence in Art and Best Senior Painter) will be held on Wed., May 26th at lunch in room 502.
Again this year we have amazing parents organizing to provide food and beverage for everyone in attendance.
Assuming I can get my act together and make some decisions in the near future about who the recipients will be it should be another great celebration of the graduating seniors.
Mark your calendars...the giving out of our annual art awards (Excellence in Art and Best Senior Painter) will be held on Wed., May 26th at lunch in room 502.
Again this year we have amazing parents organizing to provide food and beverage for everyone in attendance.
Assuming I can get my act together and make some decisions in the near future about who the recipients will be it should be another great celebration of the graduating seniors.
Tuesday, May 4, 2010
New Record
All in a day's work! Read about the Picasso that knocked Giacometti off the top of the platform.
Tuesday, April 27, 2010
Art Show Reception
Again:
Wed.
Apr. 28th
6-8 pm
Los Gatos Museum
4 Tait Ave.
Los Gatos, CA 95030
The museum's web site can be found here.
Wed.
Apr. 28th
6-8 pm
Los Gatos Museum
4 Tait Ave.
Los Gatos, CA 95030
The museum's web site can be found here.
Tuesday, April 20, 2010
Extra Credit
Here is the "official" announcement & information regarding the end-of-the-year exhibition:
Official Dates: 29 April - 27 May, 2010
Artist's Reception: 28 April, 2010; 6-8pm
Misc. info. regarding the exhibition:
Parking is a nightmare, and LG is happy to give tickets, so make sure you park in a proper location;
The awards are usually announced at around 7;
The museum is located at 4 Tait Ave. - basically across from Happy Dragon;
Regular museum hours are Wed.-Sun., 12-4pm
Yes, I do give extra credit to students who show up, and sign in, for the the reception
Official Dates: 29 April - 27 May, 2010
Artist's Reception: 28 April, 2010; 6-8pm
Misc. info. regarding the exhibition:
Parking is a nightmare, and LG is happy to give tickets, so make sure you park in a proper location;
The awards are usually announced at around 7;
The museum is located at 4 Tait Ave. - basically across from Happy Dragon;
Regular museum hours are Wed.-Sun., 12-4pm
Yes, I do give extra credit to students who show up, and sign in, for the the reception
Monday, April 5, 2010


Tuesday, March 30, 2010
Art 1 Set 5 S.D. 3
For the "new" study drawing #3 topic, do not forget to tape your venn diagram into your sketchbook.
For those of you who were absent, you will need to come in during tutorial to make up this exercise of comparing/contrasting before spring break. It will only take about 15 minutes, but we are not planning on giving more class time for that study drawing.
Also, your grid drawings are due next week before spring break!!!!!!!
For those of you who were absent, you will need to come in during tutorial to make up this exercise of comparing/contrasting before spring break. It will only take about 15 minutes, but we are not planning on giving more class time for that study drawing.
Also, your grid drawings are due next week before spring break!!!!!!!
Thursday, March 18, 2010
Art 1, new for set 5 (#2)
For the "new" Set 5 Study Drawing #2, follow these instructions.
1) Begin by tracing the 8x10" matboard template onto the page for s.d. #2 (as you did for the initials you did for s.d. #1)
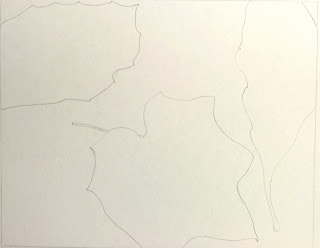
2) Next choose an odd number of leaves and draw their exterior contour (do not trace them) into that rectangle. See example below. Yes, it is o.k. if they go outside of the edges of the rectangle. You can see that I did mine fairly large so as to not have to paint as many tiny shapes later. : )
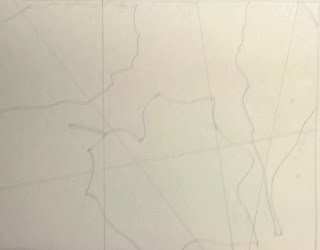
3) Once you have your leaves drawn, use a ruler to draw an odd number of diagonal lines from one edge of your paper to another so that the lines bisect/intersect the leaves.
See example below (yes, I know it's blurry, but you can still get the picture - no pun intended!).
4) Get your watercolors handy and mix up a color/value that utilizes at least 3 colors in the mixture. Begin by painting one of the shapes.
This is where is gets a little confusing so let me try to explain the process as you look at the next two pictures.
You are painting "every other" shape. You want to allow all of the lines you have drawn to still "show up." The painted portions will be touching at "corners" or "points" instead of longer (straight or curved) lines.
It is helpful to put really light/tiny "x's" in the spaces you are going to paint before you paint them so you do not get confused.
In essence, if you paint part of a leaf, in the area adjacent to it, on either top/bottom or side(s) you will paint the area outside of the leaf - the negative space.
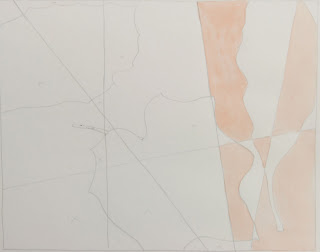 4.2) The finished product should look like this (below). You can still see the shapes of the leaves, as well as the diagonal lines, but the surface has been fragmented/abstracted so that it becomes more about shape and color vs. drawing perfect leaves.
It's a different "way" of looking, and forces you to use a different part of your brain...which is good!
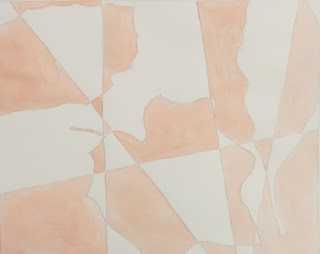 Again, this is the "new" study drawing #2 for set five. Your finished product should resemble the picture above. If you have questions, please ask.
1) Begin by tracing the 8x10" matboard template onto the page for s.d. #2 (as you did for the initials you did for s.d. #1)
2) Next choose an odd number of leaves and draw their exterior contour (do not trace them) into that rectangle. See example below. Yes, it is o.k. if they go outside of the edges of the rectangle. You can see that I did mine fairly large so as to not have to paint as many tiny shapes later. : )

3) Once you have your leaves drawn, use a ruler to draw an odd number of diagonal lines from one edge of your paper to another so that the lines bisect/intersect the leaves.
See example below (yes, I know it's blurry, but you can still get the picture - no pun intended!).

4) Get your watercolors handy and mix up a color/value that utilizes at least 3 colors in the mixture. Begin by painting one of the shapes.
This is where is gets a little confusing so let me try to explain the process as you look at the next two pictures.
You are painting "every other" shape. You want to allow all of the lines you have drawn to still "show up." The painted portions will be touching at "corners" or "points" instead of longer (straight or curved) lines.
It is helpful to put really light/tiny "x's" in the spaces you are going to paint before you paint them so you do not get confused.
In essence, if you paint part of a leaf, in the area adjacent to it, on either top/bottom or side(s) you will paint the area outside of the leaf - the negative space.
 4.2) The finished product should look like this (below). You can still see the shapes of the leaves, as well as the diagonal lines, but the surface has been fragmented/abstracted so that it becomes more about shape and color vs. drawing perfect leaves.
It's a different "way" of looking, and forces you to use a different part of your brain...which is good!
 Again, this is the "new" study drawing #2 for set five. Your finished product should resemble the picture above. If you have questions, please ask.
Tuesday, March 16, 2010
Art 1 Matboard
As announced in class today, you need to get one 32" x 40" sheet of matboard.
Not each, but for two people to share.
The color doesn't matter to me as long as it is NOT black or white - avoid those two at all costs (they are just too "contrasty" compared to your pencil drawing...trust me). Do, though, get something you like and/or think will look good with your drawing.
The best selection will be found at University Art on Meridian just off of 280 (heading southbound towards San Jose. Closer will be Aaron Bros. on Bascom (on the corner shopping center at Hamilton - near Whole Foods).
Of course other places carry this item as well, but they may not have exactly what you/we need.
We will be using this to "frame" your finished grid drawing, so make sure it is "clean" and the corners are in good shape.
Not each, but for two people to share.
The color doesn't matter to me as long as it is NOT black or white - avoid those two at all costs (they are just too "contrasty" compared to your pencil drawing...trust me). Do, though, get something you like and/or think will look good with your drawing.
The best selection will be found at University Art on Meridian just off of 280 (heading southbound towards San Jose. Closer will be Aaron Bros. on Bascom (on the corner shopping center at Hamilton - near Whole Foods).
Of course other places carry this item as well, but they may not have exactly what you/we need.
We will be using this to "frame" your finished grid drawing, so make sure it is "clean" and the corners are in good shape.
Subscribe to:
Posts (Atom)